
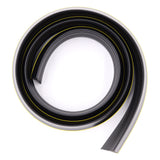

Floor Weather Seal to Suit Garage Doors
Previous Product Next ProductIn stock
WSFLOOR
Remote Pro
Remote Pro Garage Door Floor Seal
Product Options:
This listing offers two different choices for the length of the Floor Weather seal, available in the following:
Per meter
21m of weather seal
If you require a specific amount of weather seal, simply select the 1m option and adjust the quantity to your desired length. We will ensure it's delivered in a single, continuous piece!
Please be aware that this product does not come with adhesive included. We recommend using Polyurethane or MS Polymer Sealant available at Bunnings for secure installation.
Compatibility and Functionality:
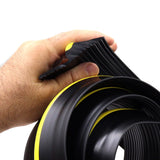
The floor seal serves as a barrier, effectively blocking water and deterring rodents from infiltrating your garage. It creates a robust seal between your garage floor and door, effectively closing off a potential entry point for both water and rodents into your home. Crafted with precision and custom-made right here in Australia, Remote Pro offers you the ideal solution for safeguarding your home.
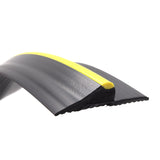
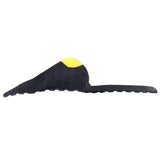
Remote Pro Floor Seal:
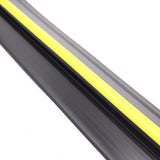
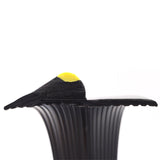
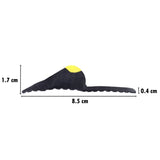
The dimensions of this Remote Pro Garage Door Floor Seal are 85mm in width from left to right and 18mm in height. Additionally, it features a high-visibility strip along the seal to enhance safety.
Remote Pro Garage Door Floor Seal Installation:
Prepare the Area:
Before commencing the installation of your new Remote Pro Floor Seal, it's essential to prepare the concrete floor surface carefully by eliminating any dust, oil, and grease. In the case of a painted floor, it's necessary to remove the paint in the areas where you plan to apply adhesive. This preparation is crucial to achieve an optimal seal.
Prior to initiating the installation process, place the floor seal under direct sunlight for a few hours. This step will allow the seal to soften and reduce its memory, making the installation process smoother.
Step 1:
Determine the total width of the garage door opening, measuring from brick to brick, and then add an additional 100mm for an overhang to accommodate trimming around the door frame. Trim the seal to the required length.
Step 2:
Place the seal along the inner edge of the garage door frame, and use a pencil to mark the points where the floor seal should be cut to fit around the door frame at both ends. Trim the seal with a Stanley knife (Ensure all correct personal protective equipment is worn), ensuring a tight and snug fit around the door frame.
Step 3:
From inside the garage, make sure the door is closed, and gently slide the floor seal beneath the door in such a way that the raised portion of the seal contacts the lower inside edge of the garage door. Once you've positioned it to your satisfaction, use a pencil to mark the entire length of the seal along the floor. Then, open the door cautiously and mark the floor along the outside edge of the seal.
Note: You can verify a proper fit by checking for any light seeping through between the floor seal and the garage door's bottom seal when the door is closed. There should be no visible light, ensuring a watertight seal.
Step 4:
Take off the floor seal, and then mark two parallel lines positioned 10mm inside the previously marked lines on the floor. Follow the manufacturer's instructions to apply a 4-5mm bead of sealant or adhesive along the two inner parallel lines. Additionally, apply sealant in a zigzag pattern between these lines, as per the diagram to the right.
Once you've completed the sealant application, promptly place the floor seal into position.
Step 5.
To complete the installation, begin at one end by positioning the floor seal over the sealant on the floor and firmly pressing it downward. Repeat this process along the entire length of the seal. Thoroughly inspect the fit and make any required adjustments before the sealant sets. If there's excess sealant, you can wipe it away immediately or neatly trim it once it dries.
Close the garage door on top of the seal and keep it closed for a minimum of 8 hours. This will ensure a continuous pressure on the floor seal, allowing the adhesive to bond correctly.
During this period, avoid driving over the floor seal.
